


Are you tired of your cat scratching up your furniture? Looking for a solution that is both stylish and functional? Look no further than a DIY cactus cat scratching post!
Cacti have become a popular design trend in recent years, and now you can incorporate them into your cat's furniture too.
Not only will this scratching post keep your cat entertained and prevent them from damaging your belongings, but it will also add a unique and trendy touch to your home decor.
In this article, I will guide you through the steps of creating your own DIY cactus cat scratching post, including the materials you will need and the simple assembly process.

Get ready to unleash your creativity and give your feline friend the perfect scratching spot!
Yes, you read that right, a cat scratcher in the shape of a cactus, which will not only save your furniture from your cat's claws but will also look fabulous in your living room.
As a bonus, thanks to the shape of the cactus, your cat will not only love to scratch it with their nails but will also love to hang from it while trying to hunt down those bright flowers from the top.
It is the perfect scratching post for your special kitty!
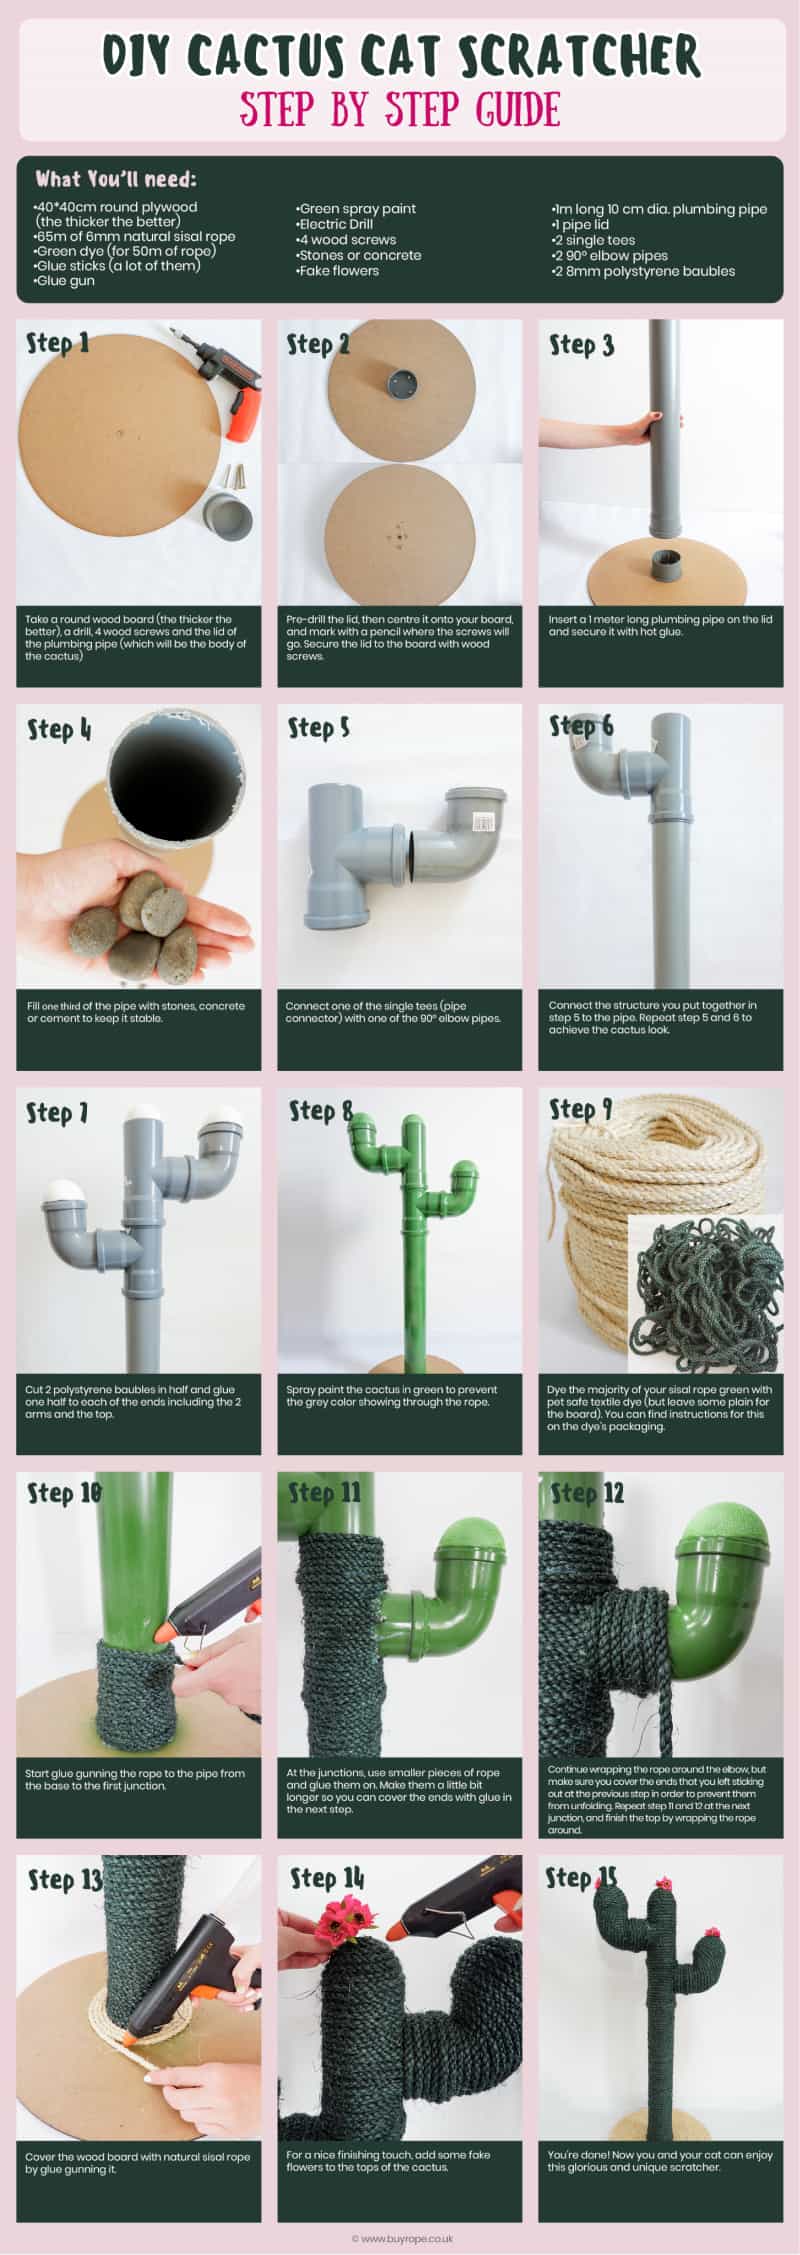
What you'll need to make this fun cat post:
- 15 x 15-inch round piece of plywood (the thicker and heavier the better, as it gives a stable wood base to the structure)
- 25-inch dia. natural sisal rope, 210 ft. long
- Green dye (for 160 ft. of rope)
- Glue sticks (warning: you'll need lots, so the bigger the pack the better)
- Hot glue gun
- Green spray paint
- Electric drill
- 4 wood screws
- Stones or concrete to fill the body of the scratcher
- Fake flowers for a touch of cuteness
- 4-inch diameter PVC pipe, 3.2 ft. long (or cut a longer one to size)
- 1 pipe lid
- 2 single tees
- 2 90° elbow pipes
- 2 3-inch polystyrene baubles

How to make this unique DIY Cat Scratching Post:
1. Take a round wood board (the thicker the better), a drill, 4 wood screws, and the lid of the plumbing pipe (which will be the body of the cactus)
2. Pre-drill the lid, then center it onto your board and mark with a pencil where the screws will go. Secure the lid to the board with wood screws.
3. Insert a 1-meter-long plumbing pipe on the lid and secure it with hot glue.
4. Fill one-third of the pipe with stones, concrete, or cement to keep it stable.
5. Connect one of the single tees (pipe connector) with one of the 90-degree elbow pipes.
6. Connect the structure you put together in Step 5 to the pipe. Repeat Steps 5 and 6 to achieve the cactus look.
7. Cut 2 polystyrene baubles in half and glue one half to each of the ends including the 2 arms and the top.
8. Spray paint the cactus green to prevent the grey color from showing through the rope.
9. Dye the majority of your sisal rope green with pet-safe textile dye (but leave some plain for the board). You can find instructions for this on the dye's packaging.
10. Start glue gunning the rope to the pipe from the base to the first junction.
11. At the junction, use smaller pieces of rope and glue them on. Make them a little bit longer so you can cover the ends with glue in the next step.
12. Continue wrapping the rope around the elbow but make sure you cover the ends that you left sticking out at the previous step in order to prevent them from unfolding. Repeat Steps 11 and 12 at the next junction, and finish the top by wrapping the rope around.
13. Cover the wood board with natural rope by glue gunning it down.
14. For a nice finishing touch, add some fake flowers to the tops of the cactus.
15. You're done! Now you and your cat can enjoy this glorious and unique scratcher.
Helpful Tips:
Before diving into this project, here are some extra tips that will help you build the most unique cat scratching post you've ever had:
- You will need more glue than you might think at first, so make sure to buy a big pack.
- In order for the cat scratcher to last a long time, make sure you use a generous amount of glue and wrap the sisal rope very tightly around the pipe.
- When using the textile dye or the paint spray, use gloves, otherwise your hands will turn green.
- After cutting the sisal rope, make sure to secure the ends, as it unfolds easily. Also, give enough time for the rope to soak up the liquid before rinsing it.
Once you've got all the things and tips needed for this project, all you have to do is to follow the step-by-step guide below and build your own cactus-shaped cat scratcher.
After completing your DIY cat tree, just take a step back and let your cat have fun with it while admiring your work.
FAQ's
Yes! All kitties from kittens to adults will love this fun scratching post!
Of course! Your feline friend won't be able to resist their new scratching post!
With a few adjustments, the cactus design can be made larger or smaller. However, any adjustments will need to be accounted for throughout the design. You can use any color you desire. We used green to stick with the cactus theme.
This fun scratching post is super durable and long-lasting. However, if the rope wears out, simply remove the rope and replace with new - easy peasy!
Yes! Most are simple materials you probably have at home. Otherwise, you can find the other materials at your local craft and/or hardware store.
Print the instructions for this cute DIY Cat Scratching Post!

DIY Cactus Cat Scratching Post
Give your cat a stylish and affordable scratching post with this DIY Cactus Cat Scratching Post. Learn how to make it by using these easy-to-follow step-by-step instructions!
Materials
- 15 x 15-inch round piece of plywood (the thicker and heavier the better, as it gives a stable wood base to the structure)
- 25-inch dia. natural sisal rope, 210 ft. long
- Green dye (for 160 ft. of rope)
- Glue sticks (warning: you’ll need lots, so the bigger the pack the better)
- Hot glue gun
- Green spray paint
- Electric drill
- 4 wood screws
- Stones or concrete to fill the body of the scratcher
- Fake flowers for a touch of cuteness
- 4-inch diameter PVC pipe, 3.2 ft. long (or cut a longer one to size)
- 1 pipe lid
- 2 single tees
- 2 90° elbow pipes
- 2 3-inch polystyrene baubles
Tools
- Hot glue gun
- Electric drill
Instructions
- Take a round wood board (the thicker the better), a drill, 4 wood screws, and the lid of the plumbing pipe (which will be the body of the cactus)
- Pre-drill the lid, then center it onto your board and mark with a pencil where the screws will go. Secure the lid to the board with wood screws.
- Insert a 1-meter-long plumbing pipe on the lid and secure it with hot glue.
- Fill one-third of the pipe with stones, concrete, or cement to keep it stable.
- Connect one of the single tees (pipe connector) with one of the 90-degree elbow pipes.
- Connect the structure you put together in Step 5 to the pipe. Repeat Steps 5 and 6 to achieve the cactus look.
- Cut 2 polystyrene baubles in half and glue one half to each of the ends including the 2 arms and the top.
- Spray paint the cactus green to prevent the grey color from showing through the rope.
- Dye the majority of your sisal rope green with pet-safe textile dye (but leave some plain for the board). You can find instructions for this on the dye's packaging.
- Start glue gunning the rope to the pipe from the base to the first junction.
- At the junction, use smaller pieces of rope and glue them on. Make them a little bit longer so you can cover the ends with glue in the next step.
- Continue wrapping the rope around the elbow but make sure you cover the ends that you left sticking out at the previous step in order to prevent them from unfolding. Repeat Steps 11 and 12 at the next junction, and finish the top by wrapping the rope around.
- Cover the wood board with natural rope by glue gunning it down.
- For a nice finishing touch, add some fake flowers to the tops of the cactus.
- You're done! Now you and your cat can enjoy this glorious and unique scratcher.
Notes
- You will need more glue than you might think at first, so make sure to buy a big pack.
- In order for the cat scratcher to last a long time, make sure you use a generous amount of glue and wrap the sisal rope very tightly around the pipe.
- When using the textile dye or the paint spray, use gloves, otherwise your hands will turn green.
- After cutting the sisal rope, make sure to secure the ends, as it unfolds easily. Also, give enough time for the rope to soak up the liquid before rinsing it.
Minta Boggs says
This is cute and probably better made than the stores.
Dorothy Boucher says
What a fantastic idea this is. I wish I had thought about it. I love the design and how easy this is to make.
@tisonlyme143
Renee T says
Thanks for sharing!
Shannon says
My cats would love this, thanks for sharing how to make it with us.
Doreen says
So cute!!
Calvin says
This is so neat, always wondered how cat trees or even cardboard scratchers are made.. awesome.
Cali W. says
This is so cute and it goes with my southwestern style.
KariLorr says
That is so adorable, and would look very cute in my apartment.
LeAnn Harbert says
This would be cute to make for my Mother for her cats to play with.
Amy Nick says
Have never seen or heard of this one before, but...... im in love !!!
Sarah L says
That makes a very cute cat scratcher. I made one kind for my cat many years ago and it was well used.
kathi bennett says
My cat would love this! I love that it looks like I could do it without much help!
Rochelle Haynes says
This is so cute looking good
heather says
This is way way way beyond cute and it sounds pretty easy to make. Thanks for sharing this one I would love to make one of these for our cats.
Brandi Dawn says
This is soooo cool! I love it! I just made bee skeps using this type of rope and it came out so nice. AND I have extra!